

Ombre cakes have become a popular trend in the world of cake decorating due to their striking appearance and beautiful gradient of colors. The word “ombre” comes from the French word meaning “shaded” or “graduated,” and it perfectly describes this technique, where one color gradually fades into another. If you want to create a stunning ombre effect on your cakes, this step-by-step guide will walk you through the entire process—whether you’re a beginner or an experienced baker. By the end of this guide, you’ll be able to create an ombre cake that’s visually striking, smooth, and beautifully blended. Let’s dive into the essentials of making your very own ombre cake at home!
What You’ll Need to Make an Ombre Cake
Before you start, gather all the materials and ingredients you need to make your ombre cake. Here’s a checklist:
Ingredients:
- Cake Batter (prepared from your favorite recipe or box mix)
- Buttercream Frosting (or any frosting of your choice)
- You’ll need a large batch to cover the entire cake and some extra to mix with the colors.
Tools:
- Cake pans (usually 3 or 4 8-inch round pans for even layers)
- Piping bags (optional, but helpful for frosting)
- Offset spatula (for smoothing the frosting)
- Bench scraper (optional, for perfecting the frosting)
- Food coloring (gel food coloring works best, as it doesn’t affect the consistency of your frosting)
- Turntable (optional, for easy rotating while decorating)
- Measuring spoons (for adding precise amounts of food coloring)
Step 1: Bake the Cake Layers
The first step in making an ombre cake is to bake the cake layers. For a traditional ombre effect, you’ll typically bake three or four layers of cake. Here’s how you can do it:
- Prepare your cake batter: You can use any cake batter, but a classic vanilla or white cake works best for an ombre effect since it provides a clean canvas for the colors.
- Divide the batter: Once you have the batter ready, divide it into separate bowls. For three layers, divide the batter into three portions. The amount of batter in each bowl will determine how many colors you will create.
- Color the batter: Add a different amount of gel food coloring to each portion of the batter. The more food coloring you use, the darker the shade will be. For example:
- Lightest layer: Add just a drop or two of food coloring.
- Medium layer: Add a little more food coloring, so it’s noticeably darker than the lightest layer.
- Darkest layer: Add the most food coloring to make the darkest shade.
- Bake the layers: Pour each portion of batter into prepared cake pans. Bake according to the recipe’s instructions, and let the cakes cool completely before frosting. If you want perfectly even layers, you can level the cakes once they’ve cooled.
Step 2: Prepare the Buttercream Frosting
To create an ombre effect, you’ll need enough buttercream frosting to coat all the layers. You can use any frosting you like, but buttercream is the most common choice because of its smooth consistency and ease of coloring. Here’s how to make it:
- Make your buttercream frosting: Beat softened butter with powdered sugar until light and fluffy, then add vanilla extract and a pinch of salt. Gradually add a little heavy cream or milk to reach your desired consistency. You can also use cream cheese frosting for a tangier flavor.
- Divide the frosting: Divide the frosting into 3 (or 4) bowls to match the number of cake layers. You’ll color each bowl of frosting with different amounts of food coloring, similar to how you divided the cake batter.
Step 3: Color the Buttercream
To achieve the ombre effect, you’ll be working with multiple shades of the same color. Here’s how to color the frosting:
- Lightest Color: Take the first portion of frosting and add a tiny amount of food coloring. Mix until you achieve the lightest shade of the color you want for your ombre cake.
- Medium Color: In the second bowl of frosting, add more food coloring to create a medium shade, darker than the first one.
- Darkest Color: For the last bowl of frosting, add the most food coloring to create a deep, bold shade.
Tip: Use gel food coloring for vibrant, concentrated colors that won’t water down your frosting.
Step 4: Assemble the Cake
Now it’s time to layer your cakes and start frosting them. The goal is to create smooth transitions from light to dark colors.
- Start with the lightest layer: Place the first, lightest cake layer on your cake stand or turntable. Spread a thin layer of the lightest frosting over the cake using an offset spatula. Don’t worry about being perfect—this layer will be covered by the next.
- Add the medium layer: Place the second cake layer on top of the first one. Spread the medium-colored frosting over this layer, covering it completely. You can smooth the frosting with an offset spatula or a bench scraper to make it even.
- Add the darkest layer: Place the final, darkest cake layer on top. Frost this layer with the darkest frosting. Again, smooth it out as best as you can.
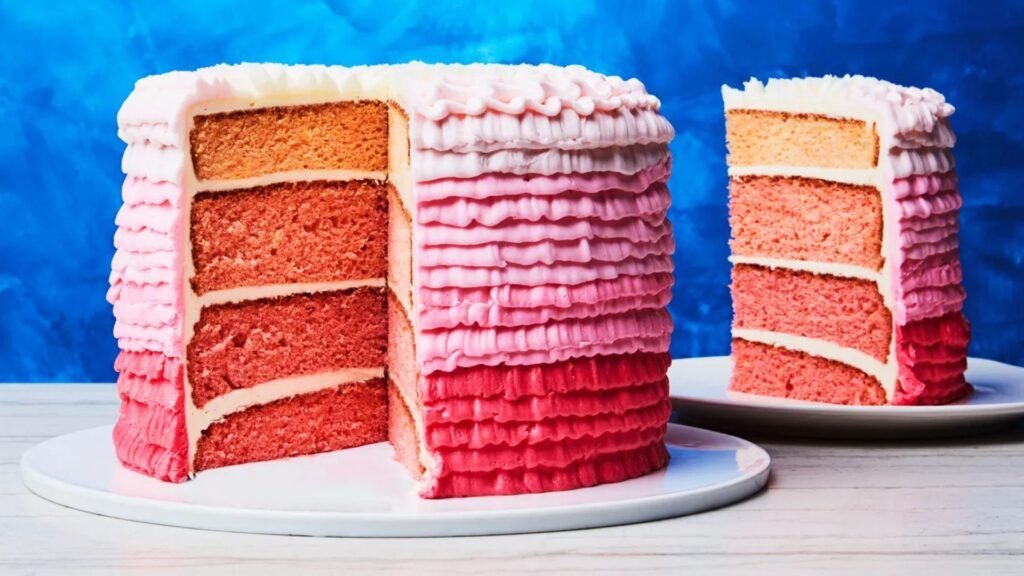
Step 5: Create the Ombre Effect
Once your cake is frosted with all three layers, it’s time to blend the frosting colors for the ombre effect.
- Crumb Coat: Start by applying a crumb coat to seal in any crumbs. This is a thin layer of frosting that covers the whole cake, making it easier to apply the final coat. Once the crumb coat is on, refrigerate the cake for about 20 minutes to set it.
- Smooth the Frosting: After the crumb coat has set, apply a thick layer of each colored frosting. Use an offset spatula to smooth each color, from the lightest to the darkest, as evenly as possible.
- Blend the Colors: To create the smooth gradient, use a bench scraper or a straight spatula to gently blend the colors. Hold the scraper at a slight angle to the cake and turn the cake slowly on the turntable. Start with the lightest color at the top and gradually work your way down, smoothing out the frosting. The colors will start to blend seamlessly from light to dark.
- Final Touches: If you want a more defined ombre effect, you can use a piping bag to pipe on the frosting in horizontal lines and then blend them with the spatula for a softer, gradient look.
Conclusion
Creating an ombre cake at home is a fun and rewarding project that will impress your guests with its stunning visual appeal. With just a few simple techniques, you can master the art of the ombre effect and turn any cake into a showstopper. Whether you’re making a birthday cake, a wedding cake, or just want to try something new, this technique is a fantastic way to add a burst of color and creativity to your baking repertoire. So, gather your ingredients, follow the steps, and enjoy the process of making a beautiful ombre cake!
Incredible points. Great arguments. Keep up the amazing spirit.
These thca infused flower felt like a de facto kindly middle ground. Nothing too inequitable, simply a glib and balanced happening that worked amply quest of offhand use. The taste was preferably than expected, and the configuration was toothsome in preference to of immoderately dank or tough. They also approve sense as inclined gummies THC because the comprehensive vibe felt cosy, enjoyable, and great into relaxing socially or scarcely hanging out. The whole kit from flavor to nature to consistency felt articulately done here.